Guidelines for self-created Google Groups
Official bodies and individuals needing a new Google group should normally create it themselves, following our naming guidelines.
Creating Groups
For more information, see:
Please note:
- All self-created groups will have a suffix of '-group', eg mygroupname-group@york.ac.uk
- If you need an email address without the '-group' suffix, please contact IT Services
- Group names must not contain obscenities or any offensive language
- Group names should reflect the group to which it pertains and should not attempt to represent itself as another body or organisation
- IT Services reserve the right to rename or delete any group deemed to be named inappropriately. This may result in all corresponding mail and data within the group becoming unavailable
- Consider the group settings carefully - for example, it may not be appropriate for your group to appear in the Groups Directory, or you may wish only to allow group members to post to the list
6 things to watch out for...
It's important that your group is set up correctly - to ensure that you have an appropriate group name, that the right posting, access and visibility settings are in place, and that you know how to manage the membership. This is important for times when you need to limit who can see members of the group, or control who can send an email to all members of that group. Click on the tabs below to find out more.
Naming
Why the name matters
Your Google group will appear in the University's global address book, and people typing the first few letters will see it pop-up as an auto-complete suggestion. There have been cases of people sending emails - sometimes with sensitive information - to the wrong group. Careful naming will help to prevent this.
What you should do
Choose a name that's descriptive, so there is no confusion about who the recipients will be. Select an appropriate email address (you'll be offered a default option, but you can edit it if you wish).
Make the name as short as possible, so that all or most of it shows in the auto-complete list. If you use a department prefix on all group names, keep it short.
Suitable examples of group names and email addresses include:
- Biology first years - biol-ugrad-1st
- Chemistry administrative staff - chem-staff-admin
- Halifax College residents - halifax-residents
Roles and Permissions
Roles
Google groups settings rely on different roles that are assigned to users who have been added to the group. These three different roles can be assigned to users to give different levels of access and control.
- Members are the majority of users where view or posting access can be restricted.
- Managers can be added with more permissions to view and control some settings for the group.
- Owners have rights for all permissions and can fully change the group settings. A group can have mutliple owners.
It's also possible to create Custom roles, for different levels of access.
Who can read the messages?
When creating a Google Group some of the settings can be overlooked causing issues later when your discussions are discovered to be readable by everyone at York. If your group is indeed open to anyone at York then this is fine; however if you are discussing private or sensitive issues then this setting must be changed.
In Google Groups, select the group name and go to Group Settings | General | Who can view conversations to change this - options include Group Owners, Group Managers and Group Members, depending on who should see all emails and replies sent to the group address.
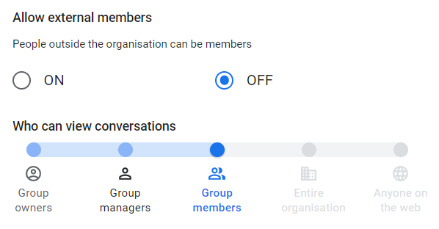
Remember that, even if you use the group as an email address and send messages via your email application, the messages will still appear on the group’s web page so it’s important to check these settings.
Who can email the group address and see members?
By default, it's set that all members can 'post' to the group. This means that any member could send an email to the group address, which could be seen by all members of the group. Depending on the purpose of your group, you may need to restrict posting to Owners or Managers, to prevent all users from being able to email everyone in the group. If members are not allowed to post, they will receive an automated email to say their post was not successful when emailing that group address.
To check this setting in Google Groups, select the group and go to Group Settings | General | Who can post.
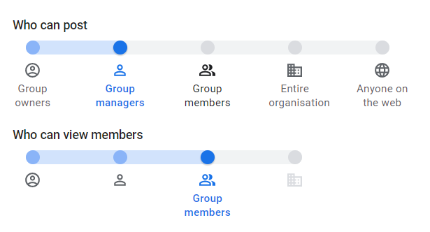
Who can view members can also allow you to control who can see a list of members in the group. By default, users are able to view the group on the Google Groups webpage and can see other members registered to the group. If your group contains users who should not see any details of any other members, ensure this is set to Group Managers or Group Owners.
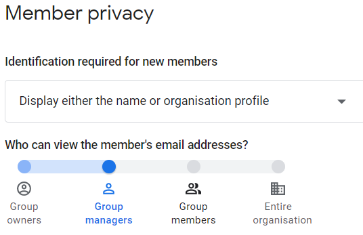
There is also a separate setting in Group Settings | Member Privacy | Who can view member's email addresses. This could be used where the members can be viewed by other members by name, but their email address is hidden.
Who can join?
Who can join the group
Who can join your group is an important setting. You may have correctly restricted access so only members of your group can see its messages, but if you just allow anyone to join then your messages are just a click away! You can control who can join using Group Settings | General | Who can join group. Options range from making the group entirely public (be wary of this option) to restricting membership to users who are invited by an owner or manager of the group.
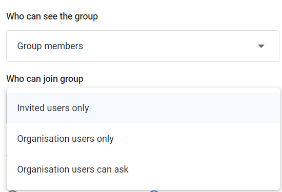
Often you want complete control of who are members of your group; in this case select Invited users only— that is, people you explicitly invite to join your group. If you want people to be able to ask to join, choose Organisation users can ask - you will have to approve or decline membership requests.
When membership is restricted to Organisation users only this means to anyone with an @york.ac.uk email address. This includes all staff and students, and can also include various associates, temporary accounts issued to conference delegates etc.
Think very carefully before making your group fully public - this will allow anyone anywhere in the world to join without you first checking their request: this can include spammers, who will bombard your group’s members with junk email.
Adding external members
If you wish to allow external people (ie those without an @york.ac.uk email address) to join your group you need to:
- Go to Group Settings | General | Allow external members
- Change the radio button to ON
- Go to Group Settings | Member Privacy | Identification required for new members and check Display either the name or organisation profile is selected.
- If you don’t do this, then only people who have used their external email address to register a Google Account will be able to join your group.
There are limits on the numbers of users you can add at one time. See the Adding Members tab for more information.
Adding members
Adding internal and external members
If you wish to add over 100 new members to your group, you will need to add them in batches. Google imposes this restriction to prevent people from creating and automatically adding to people to groups with the aim of spamming them.
When you add external (ie not @york.ac.uk) addresses you can only add 10 at a time, as well as a maximum number per day. It’s best to add the @york.ac.uk addresses in one set of batches, and then separately do (smaller) batches of other addresses.
Managing multiple groups
Managing groups and sub-groups
Each Google Group is managed by one or more owners, who look after adding or removing its members. A group made up of, for example, History staff doesn’t magically “know” who should belong to the group and add them itself. Instead, the group owner looks after updating its membership. However, a Google group can detect when a member’s email address is expired or removed and will remove them - but this won't happen if a member moves to another department, rather than leaving the University. Members can also remove themselves if they wish.
To prevent duplication, and to save you having to add people to lots of separate groups, you can add one group as a member of another. For example, suppose you want:
-
a group for all History Staff
-
a group for all History Undergraduates
-
a group for all History Postgraduates
-
a Group that includes everyone: Staff, Undergraduates and Postgraduates
You can do easily this as follows:
-
create the group “history-staff-group@york.ac.uk” and add its members
-
create the group “history-ug-group@york.ac.uk” and add its members
-
create the group “history-pg-group@york.ac.uk” and add its members
-
create the group “history-all@york.ac.uk” and to it add only:
-
history-staff-group@york.ac.uk
-
history-ug-group@york.ac.uk
-
history-pg-group@york.ac.uk
-
This saves you adding people separately to both their specific Staff, Undergraduate or Postgraduate group and also to the “All” group.
Groups directory
Google Groups directory
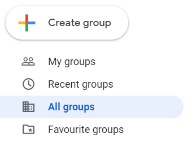
Everyone at York can browse the Groups created at York using the All Groups button on the Google Groups home page. You can remove your group from the directory but this doesn’t make the group private - to do this, make the changes described on the Who can Join? tab.
