Staff essentials
-

- Staff home
- Staff essentials
- Staff supporting students
- Student Check-In
- How to access Check-In reports (PS staff)
How to access Check-In reports
Professional Services staff
Introduction
Overview
For Professional Services staff there are four reports available within Check-In Flow:
- Attendance overview: To see a student’s attendance percentage within a date range period. The data is broken down by number of absences, total sessions attended, and total available (including not observed). This report can be run on an individual student, all students in a cohort or department or module. It allows the user to define a threshold so only students below a certain percentage are displayed.
- Personal engagement: To see an itemised list of all teaching activities a particular student is scheduled to and their attendance results over a date range period. A summary calculating attendance percentages at different event types is also available.
- Attendance register: A Register view report which can be run on a chosen week to show a list of all students attending an event and whether they were present or absent. This report can also be generated to see all attendance results at a departmental level.
- Incomplete registers by activity: To see a list of all modules and activity names which didn’t have any students attending, regardless of whether a code was generated. All reports prior to today will be either 0 or 100% completion. On the day they will be of varying percentages until the automatic marking as absent process completes at 9pm.
Attendance statuses
In the Personal Engagement and Attendance Register reports there is a ‘Presence’ column which could contain the following statuses:
- Present: The student checked in or a member of staff marked them as present at an event.
- Unexplained Absent: An absence without a reason or a missed event, either marked manually or automatically by the system due to the student not checking in.
- Explained Absent (department absence) or Explained Absent (self-certified absence): An Absence has been logged in the system to say a student has a reason to be absent, therefore not affecting their attendance percentage.
- Not observed/Unknown: The event didn’t go ahead or had no check-in codes logged. This does not count towards a student's attendance percentage.
Reports
Attendance overview
1. First choose the ‘Period’ date range you wish to search for. When using the date picker make sure to click the start date first, then without clicking off the date picker, move onwards to the latest date and select this next. The date range will be highlighted in blue.

2. Within the ‘Student tree’ you can search through the list to find a department, cohort, or route/year.
For full department searches, tick the box under Academic for your department:

3. To find a cohort or route/year, drill down into the department and then into Courses:

4. It is also possible to search for an individual student by name, IT username, or student number in the ‘Student tree’ but sometimes it takes a few seconds to load as the system searches through the database. You’ll notice it displays where the student sits in the tree. Tick the highlighted student to have the report run for an individual.

5. The ‘attendance threshold’ can be used to limit the students showing on the report to those under a certain percentage amount. Type in 100 to show all students.
6. Select ‘preview’ to view the report in the browser, or alternatively it can be downloaded to Excel.

You may notice the figures for ‘Number of Absences’ and ‘Total sessions attended’ don’t always add up to the ‘Total possible sessions attended’ column and the percentages don’t calculate based on the ‘Total possible sessions attended’ either.
The ‘Total possible sessions attended’ column should instead be referred to as the total number of sessions scheduled, but not all scheduled sessions can be attended (these appear as ‘not observed’ in other reports). As ‘not observed’ sessions do not count towards a student’s attendance percentage, the numbers may not look accurate, but it is working correctly. We know a few of the events where codes aren't generated are because of non-relevant events feeding into the Check-In calendar (this is due to be filtered out in a new release).
The ‘Number of Absences’ column is only those events where the student didn't attend but others in the class did. You shouldn't worry about the extra number in the ‘Total possible sessions attended’, as the percentage is always correct and worked out by multiplying the ‘Number of absences’ to the ‘Total sessions attended’. Here’s a scenario to explain this:
The student here had 25 events where a Check-In code was generated (‘number of absences’ + ‘total sessions attended’) and two events which were ‘not observed’, to equal the 27 total possible sessions scheduled. ‘Not observed’ events are not counted to work out percentages. The student had five absences out of 25, which equals 80%.

Personal engagement
- Choose the date range period as explained in step 1 of the Absence overview report.
- Type in the name, IT username, or student number of the student you wish to search for and select the student from the tree as explained in step 4 of the Absence overview report.
- The optional ‘Activity Tree’ box can be left blank.
- Select ‘preview’ to view the report in the browser, or alternatively it can be downloaded to Excel.

Attendance register
- Select the week you want to view. This report is limited to week-by-week view searches due to the quantity of data which is displayed.
- Use the ‘Person Tree’ as explained in steps 2-4 of the Attendance overview report.
- Select ‘preview’ to view the report in the browser, or alternatively it can be downloaded to Excel.

Optional
This report has added layers of complexity in the filters by combining the ‘Activity tree’ with the ‘Person tree’.
- To make use of the ‘Activity tree’, first select the top level in the ‘Person Tree’ to ‘Academic’ so the search runs against all academic students.
- To search for all students at an event in a particular module (regardless of their department to pick up joint honours students), search for a module name, eg ‘Gender War and Militarism’, or the module code, eg ‘POL00056H’, then drill down to the event and check the box.
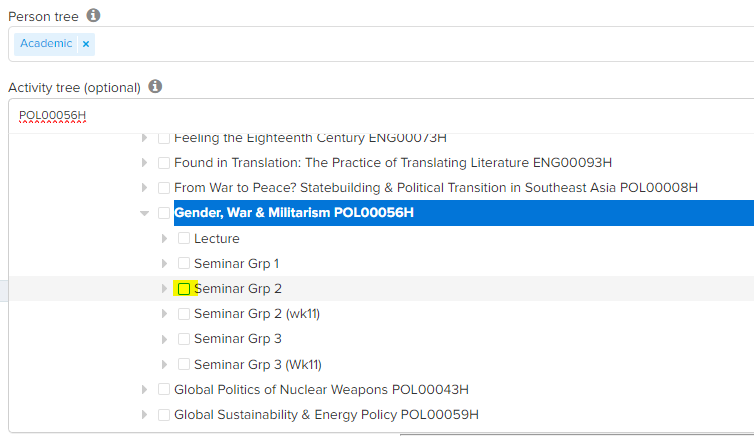
You can also search for all students on a module at all module events by checking the box highlighted above, instead of the individual event (Seminar Grp 2).
Another combination you may want to search is for a particular module but only see the students in your department on that module, not all students on the module.
This can be achieved by choosing your Department in the ‘Person Tree’ (instead of ‘Academic’) and then selecting the required module in the ‘Activity Tree’.

You may sometimes see students with a ‘Presence’ status of ‘Unexplained (Self-certified absence)’ or ‘Unexplained (department absence)’ even though all self-certified or department absences are explained. This happens when a report is run very close to when a new student absence was entered into the system. The system will check absences and mark them as explained every hour. If you’ve added an absence and run a report on that student within the hour then it shows as unexplained, even though the correct absence reason has been logged. This is just a system quirk and you should assume any absence that has ‘(Self-certified absence)’ or ‘(Department absence)’ next to it is correct, regardless of whether it says explained or unexplained; it will correct itself after one hour has passed.
This is also relevant regarding the ‘Presence’ column displaying attendance for students. Check-In attendance data at events taken on the day is still pending, so we recommend only generating reports from yesterday back, as all ‘not observed’ students (events still orange in the timetable) will automatically change to absent/missed at 9pm.
Amendment
Although not shown in the screenshots in this guide, a new data point is available within all reports called ‘Student status relevant for attendance?’.
There are currently 111 possible status codes from SITS that a student can be in. Using a list agreed with the Progression and Awards team, 61 of these mean a student is not going to be using Check-In, with the rest either Pending or Active for logging attendance in Check-In.
Instead of displaying the code, a calculation is done to tell the user if the student is relevant for attendance - displayed as ‘yes - active’, ‘pending’, or ‘no’.
Download our quick card for a printable version of these instructions: